With the back to top
links, we created new elements and inserted them on the page. It's also
possible to take elements from one place on the page and insert them
into another place. A practical application of this type of insertion is
the dynamic placement and formatting of footnotes. One footnote already
appears in the original Flatland
text that we are using for this example, but we'll also designate a
couple of other portions of the text as footnotes for the purpose of
this demonstration:
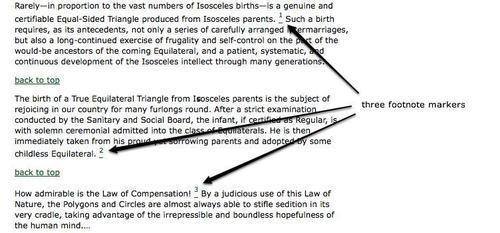
<p>Rarely—in proportion to the vast numbers of Isosceles
births—is a genuine and certifiable Equal-Sided
Triangle produced from Isosceles parents. <span
class="footnote">"What need of a certificate?" a Spaceland
critic may ask: "Is not the procreation of a Square Son a
certificate from Nature herself, proving the Equalsidedness
of the Father?" I reply that no Lady of any position will
marry an uncertified Triangle. Square offspring has
sometimes resulted from a slightly Irregular Triangle;
but in almost every such case the Irregularity of the
first generation is visited on the third; which either
fails to attain the Pentagonal rank, or relapses to the
Triangular.</span> Such a birth requires, as its
antecedents, not only a series of carefully arranged
intermarriages, but also a long-continued exercise of
frugality and self-control on the part of the would-be
ancestors of the coming Equilateral, and a patient,
systematic, and continuous development of the Isosceles
intellect through many generations.
</p>
<p>The birth of a True Equilateral Triangle from Isosceles
elementsmovingparents is the subject of rejoicing in our country for many
furlongs round. After a strict examination conducted by the
Sanitary and Social Board, the infant, if certified as
Regular, is with solemn ceremonial admitted into the class
of Equilaterals. He is then immediately taken from his
proud yet sorrowing parents and adopted by some childless
Equilateral. <span class="footnote">The Equilateral is
bound by oath never to permit the child henceforth to enter
his former home or so much as to look upon his relations
again, for fear lest the freshly developed organism may, by
force of unconscious imitation, fall back again into his
hereditary level.</span>
</p>
<p>How admirable is the Law of Compensation! <span
class="footnote">And how perfect a proof of the natural
fitness and, I may almost say, the divine origin of the
aristocratic constitution of the States of Flatland!</span>
By a judicious use of this Law of Nature, the Polygons and
Circles are almost always able to stifle sedition in its
very cradle, taking advantage of the irrepressible and
boundless hopefulness of the human mind.…
</p>

Now we can grab the footnotes and insert them in between<div class="chapter"> and<div id="footer">.
Keep in mind that even in cases of implicit iteration, the order of
insertion is predefined, starting at the top of the DOM tree and working
its way down. Since it's important to maintain the correct order of the
footnotes in their new place on the page, we should use
.insertBefore('#footer').
This will place each footnote directly before the<div id="footer"> so that footnote 1 is placed between<div class="chapter"> and<div id="footer">, footnote 2 is placed between footnote 1 and<div id="footer">, and so on. Using .insertAfter('div.chapter'), on the other hand, would have the footnotes appear in reverse order. So far, our code looks like this:
$(document).ready(function() {
elementsmoving$('span.footnote').insertBefore('#footer');
});
Unfortunately, though, we've run into a big problem. The footnotes are in<span> tags, which means they display inline by default, one right after the other with no separation:

One solution to this problem is to modify the CSS, making the<span> elements display as blocks, but only if they are not inside<div class="chapter">:
span.footnote {
font-style: italic;
font-family: "Times New Roman", Times, serif;
display: block;
margin: 1em 0;
}
.chapter span.footnote {
display: inline;
}
The footnotes are now beginning to take shape:

At least they are distinct
footnotes now; yet there is still a lot of work that can be done to
them. A more robust footnote solution should:
1. Mark the location in the text from which each footnote is pulled.
2. Number each location, and provide a matching number for the footnote itself.
3. Create a link from the text location to its matching footnote, and from the footnote back to the text location.
These steps can be accomplished from within an .each() method; but first we'll set up a container element for the notes at the bottom of the page:
$(document).ready(function() {
$('<ol id="notes"></ol>').insertAfter('div.chapter');
});
It seems reasonable enough to use an ordered list<ol id="notes"></ol>
for the footnotes; after all, we want them to be numbered. Why not use
an element that numbers them for us automatically? We've given the list
an ID of notes and have inserted it after<div class="chapter">.
Marking, numbering, and linking the context
Now we're ready to mark and number the place from which we're pulling the footnote:
$(document).ready(function() {
$('<ol id="notes"></ol>').insertAfter('div.chapter');
$('span.footnote').each(function(index) {
$(this)
.before(
['<a href="#foot-note-',
index+1,
'" id="context-',
index+1,
'" class="context">',
'<sup>' + (index+1) + '</sup>',
'</a>'
].join('')
)
});

});
Here we start with the same selector as we used with the simpler footnote example, but we chain the .each() method to it.
Inside the .each() we begin with $(this), which represents each footnote in succession, and we chain the .before() method to it.
The result of the joined array within the .before() method's parentheses is a superscripted link, that will be inserted before each footnote<span>. The first one, for example, will look like this when it's inserted in the DOM:
<a href="#foot-note-1" id="context-1"
class="context"><sup>1</sup></a>
The syntax may be
unfamiliar at first glance, so let's take a moment to investigate what
is going on. Inside the parentheses of the .before() method, we start with a pair of square brackets—[]—which represents an array literal.
Each element within the array is followed by a comma (except,
importantly, the final element). We've placed each element on its own
line for the sake of readability. Then, once the array is built, we
convert it back into a string by using the JavaScript .join()
method. This method gets an empty string as its argument, represented
by a pair of single quotation marks, because we don't want anything to
appear between each array item when it is output as HTML.
Note the use of index+1 throughout. Since counting begins at 0, we add 1 to start the href attributes at #footnote-1, the id attributes at #context-1 and the actual link text at 1. The href is particularly important because it must exactly match the footnote's id attribute (not including the # of course).
To be sure, the same result can be accomplished with a long concatenated string rather than a joined array:
.before('<a href="#foot-note-' + (index+1) +
'" id="context-' + (index+1) +
'" class="context"><sup>' +
(index+1) + '</sup></a>');
Yet in this case, the array technique seems more manageable.
Much has been
written on the web about the performance differences between joined
arrays and concatenated strings. For the ultra-curious, the following
article discusses a number of benchmark tests using the two techniques: http://www.sitepen.com/blog/2008/05/09/string-performance-an-analysis/
In most situations, however,
these differences are imperceptible. If a script's performance is an
issue, there are a number of other areas that have far greater impact
(such as "caching" selectors, which we've already discussed).
Our three linked footnote markers now look like this:
Appending footnotes
The next step is to move the<span class="footnote"> elements, as we did with the simpler example. This time, however, we drop them into the newly created<ol id="notes">. We'll use .appendTo() here, again to maintain proper ordering, as each successive footnote will be inserted at the end of the element:
$(document).ready(function() {
$('<ol id="notes"></ol>').insertAfter('div.chapter');
$('span.footnote').each(function(index) {
$(this)
.before(
['<a href="#foot-note-',
index+1,
'" id="context-',
index+1,
'" class="context">',
'<sup>' + (index+1) + '</sup>',
'</a>'
].join('')
)
.appendTo('#notes')

});
});
It's important to remember that .appendTo() is still being chained to $(this), so that jQuery is saying, Append the footnote span to the element with an ID of 'notes'.
To each of the footnotes we just moved, we append another link—this one back to the number in the text:
$(document).ready(function() {
$('<ol id="notes"></ol>').insertAfter('div.chapter');
$('span.footnote').each(function(index) {
$(this)
.before(
['<a href="#foot-note-',
index+1,
'" id="context-',
index+1,
'" class="context">',
'<sup>' + (index+1) + '</sup>',
'</a>'
].join('')
)
.appendTo('#notes')
.append( ' (<a href="#context-' + (index+1) +
' ">context</a>)' );
});
});
Notice that the href points back to the id of the corresponding marker. Here you can see the footnotes again with a link appended to each:

The footnotes still lack their numbers, however. Even though they have been placed within an<ol>, each one must also be individually wrapped in its own<li>.